Search This Blog

Wednesday, July 31, 2013

Delicious eggplant lasagna...

I don't know about you, but I love pasta dishes....any kind!  I especially love lasagna and have figured out a way to make it a little healthier.  I have learned to replace the pasta with vegetables.  So far I have used zucchini and eggplant.  Last night I used eggplant and want to share it with you.  This meal takes a little time and effort, but the final product is amazing.


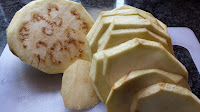
Start by peeling and slicing a large eggplant.


I like to make a batter to coat the slices as opposed to using breadcrumbs.  Breadcrumbs tend to absorb a lot of oil when you cook them, and I like the flavor of the batter.

All you do is mix the following:

about 3 cups of flour
a tsp garlic powder
a tsp of onion powder
salt and pepper
about 1/2 cup of Parmesan Cheese

and enough water to get the consistency of pancake batter.  Feel free to add any other seasonings you like.


I dust the slices with flower before dredging them in the batter.  Heat a pan with a small amount of olive oil and cook the eggplant until it gets nice and golden.


Place the cooked slices on paper towels to get rid of any excess oil.


Time to mix the ricotta filling.  For the amount of eggplant I had, I used 1/2 of a large tub of cheese and sprinkled in pretty much the same seasonings I used for the batter:  garlic powder, onion powder, salt and pepper, Parmesan cheese, fresh basil, and some parsley.


The only thing left is to put it all together.  As for tomato sauce?  I am hooked on the sauce I shared with you in my manicotti dinner blog, but feel free to use whatever is your favorite one.  Cover the bottom of your dish with sauce, place a layer of eggplant, add the ricotta mixture, sprinkle with shredded cheese, add sauce and repeat.  Reserve some sauce to add on when you serve it.

I made only two layers, but you can go as high as you would like.  Just remember the thicker the lasagna, the longer it will take to cook and the top tends to get a little dry.


I place this in a 375 degree oven for about 30 minutes. 


This is so yummy...it just melts in your mouth. 

I have to tell you though, the browned eggplant makes a great appetizer.  Let the eggplant cool and cut each slice in half.  Place them on a platter and sprinkle with Parmesan cheese.  Serve with a bowl of marinara sauce for dipping. 


Sunday, July 28, 2013

One of the best grilled buttermilk chicken recipes EVER!


Do you know how when you try something new, you're just not too sure how it is going to come out?  Well, this was one of those times!  I knew that soaking chicken or pork in buttermilk was magical in creating a really tender, juicy meat, but I had never seasoned the buttermilk first.  You really need to try this, but beware, you must let it soak overnight...the longer the better.

Add to one quart of buttermilk:

1/2 cup chopped shallots
2 tbs chopped garlic
2 tbs kosher salt
2 tbs sugar
1 tbs ground cumin
1 tsp black pepper


I mix this all together in a zip lock bag.  Immerse the chicken, zip and leave in the refrigerator.  Honestly?  I let it soak over night and I am convinced that is why the flavors were perfect.


So far this is simple!  When you are ready to cook the chicken, preheat your grill.  Dump out the buttermilk and blot the excess off with paper towels.  Cook, turning frequently for about 20-30 minutes.


When it is done, I let it rest while I cook prepare the roasted asparagus and Jasmine ginger rice.
The asparagus gets a little olive oil, salt, and pepper.  When the oven reaches 400 degrees, cook for about 15 minutes turning them a few times.  While that is going on, I prepare the rice.  Again, this is simple and takes about as long as the asparagus!  Bring to a boil 1 1/2 cups chicken broth, about 2 tbs butter, 2 tbs chopped ginger, and salt and pepper.  Add 1 cup of rice, cover, lower the heat and cook for about 10-15 minutes.  It cooks a lot quicker than regular long-grain rice does, so check it a few times.


 There you have it.  The flavor of the chicken was memorable to say the least!  The asparagus is so much better roasted than cooked in water, and the rice?  well, the rice is one of my favorites.


Thursday, July 25, 2013

Pasta with Bella Mushrooms, Carmelized Onions, Brussell Sprouts and Goat Cheese


The ingredients for this dish resulted from emptying out my vegetable drawer in my refrigerator!  What this means is you can improvise with whatever you find in your refrigerator if you would like.  I had a Vidalia onion and decided to caramelize it for a change.  I had a box of Bella mushrooms which are my favorites because they have a really nice flavor and crunchiness.   I had a bag of brussel sprouts that I decided to steam instead of going with the usual spinach.  The combination of these three ingredients alone was amazing, and when I added the goat cheese and sausage?  Delicious!  I am getting ahead of myself....let me give you the list of ingredients first:


Vidalia onion
butter
olive oil
salt and pepper to taste
crushed red pepper
1/2 teaspoon sugar
mushrooms
brussel sprouts
sweet Italian sausage
fresh parsley
pasta
goat cheese
Parmesan cheese

First off, I put a pot of water on to boil for the pasta.  I have two boxes half full of pasta that I decide to use up.  Once they are cooked, reserve 1 cup of the pasta water before dumping the rest.   Keep the pasta warm while you get everything else ready.

Next up I caramelize the onion.  Cut up the onion into wedges and combine with about 2 tablespoons of butter and two passes over the pan with olive oil.  Sprinkle the onions with the sugar and saute over medium high heat.

Cook the onions until they get a nice brown color.  When done, set aside.  Use the same pan to cook the mushrooms.


The mushrooms don't take that long to cook, so as soon as they are done, set aside and move on to the brussel sprouts.  I cut the bottoms off and remove as many leaves as possible.   I slice up what ever is left over.  I will steam these until they are tender.


Combine the onions, mushrooms, brussel sprouts and a handful of fresh parsley that has been chopped.


The last ingredient to cook is the sausage.  Remove the casings, break up, and cook.  Drain the fat and combine with the cooked vegetables and pasta.


Time to mix in the goat cheese and pour in about 1/2 of the pasta water.  Feel free to add more if needed.

At this point, add your Parmesan cheese and take a taste to see if it needs more salt and pepper.  I like to add some crushed red pepper to give it a little heat.


This is one of those "comfort dinners" that simply puts a smile on your face.  It was really delicious the next day for lunch too!


Tuesday, July 16, 2013

Heavenly manicottis made with crepes??? crazy delicious...


My first night home after being away for a week, and what do I decide to make?  Manicottis stuffed with a sweet Italian Sausage stuffing....   Call me crazy, but when I get a hankerin' for something, I will do whatever it takes!  This recipe is not difficult at all, just a little time-consuming.  Worth it?  Absolutely.

I first get the sauce going.  This is my go-to recipe for no-fail delicious sauce.  

1 large can of stewed tomatoes
1/2 large Vidalia onion roughly cut
1 stick of butter
salt and pepper

Simmer covered for about 30 minutes.  When the onions are nice and tender, remove from the heat and use a hand blender to puree.  Add some Parmesan cheese and do a taste test....add salt and pepper if needed.  Feel free to add whatever else you would like..... fresh basil, spinach, mushrooms, olives....

The next step is mix and refrigerate your crepe batter.  I found a recipe from Alton Brown that never lets me down.  Combine the following in a blender:

2 large eggs
3/4 cup milk
1/2 cup water
3 tbs melted butter

Pulse for about 10 seconds.  You don't want to mix it too much.  Put in the refrigerator (this step is key to cooking them perfectly) until you are ready to cook them. 


Now for the filling.  Remove the casings, break up and cook the sausage (I used 6 sausages).  Drain off the fat and combine with 1 container of Ricotta cheese.  Sprinkle in some parsley, Parmesan cheese, garlic powder, salt and pepper.


Set this mixture aside and start cooking your crepes.  Use a small Teflon pan sprayed with a little oil.  Pour just enough batter to coat the bottom of the pan.  Cook until set, then flip and cook for about 20 more seconds.    I think a Silicone spatula works best when flipping because it is soft and can mold to the shape of the pan.  This recipe makes approximately 8-10 crepes, so if you are feeding an army, you might want to double it.  Once you have them all cooked, you are ready to stuff and roll.....


Ladle some of your sauce in your casserole dish.  Place each rolled manicotti over the sauce.  Add more sauce on top.  A little grated cheese to finish and bake in a 350 degree oven for 20-30 minutes.

Every bite is pure heaven.....Using crepes are so much easier to stuff than the pasta manicottis that come in a box, and the flavor is amazing.  Once you make them this way, you will never go back to pasta!


Quick and easy grilled chicken dinner


Have you ever come home from work and struggled to find something to make for dinner?  Add to that the outside temperature of 95 degrees at 6:45 p.m., and your decision gets even tougher!  After pouring over countless Internet recipes, I finally decided to make up my own design.

I defrost two small packages of boneless, skinless chicken thighs and dry them off.  After adding some Caesar salad dressing, rosemary, garlic powder, salt and pepper, I set it aside to let the chicken absorb the flavors.   By now it is 7:00 and I need to hustle up.  


As time slips away, I realize a vegetable is out of the question, so I opt for a quick batch of rice pilaf.  To make this a little more interesting, I make it replacing the required water with chicken broth.  I also sprinkle in a little dried chopped onion and some butter.  

While the rice is cooking, I grill the chicken, turning frequently.  Try to keep the flames as high as possible so the chicken will cook quickly and not dry out.   It doesn't take long.

When the rice is done, I throw in a handful of sliced almonds and call it a day....  This late night dinner took all of about 45 minutes, which isn't too bad.  What's nice is the flavors were delicious and it was really easy.   Tomorrow is another day, and hopefully I will get an earlier start!


Friday, July 5, 2013

I will be coming to you from beautiful Provincetown, MA this week....

This is the view from the roof deck of the house we rent!  Beautiful...

Just wanted to let you know I will be hopefully blogging from the beautiful town of Provincetown, MA this coming week.   If I find any amazing restaurants, I'll let you know, and on the nights it is my turn to cook, I'll be sure to share with you what I end up making....would you believe I take one of those plastic shower totes and fill it up with my favorite seasonings from  home!  I can't cook when I don't have my "stuff!"

I hope you made some delicious dishes over the holiday and enjoyed your Fourth of July.  What do we all say?   Once we reach the 4th of July, the summer is officially half over!  NOT!

I'll be back in my new kitchen in a week....

Pasta Salad with Shrimp


This pasta salad, by far, will become one of your favorites.  Not only does it taste delicious, but it only has a few easy ingredients.  I used one pound of pasta and doubled the dressing for the crowd I was making it for, but please feel free to adjust the amounts  for quantity and taste.

Here is what you will need:

3 cups (8 ozs) pasta
1 tsp salt
Fresh snap peas
1 pkg frozen cooked medium shrimp (add more if compelled...my favorite part!)
1 basket cherry tomatoes
5 scallions, cut
shredded Parmesan cheese
1/3 cup Pesto
1/4 cup light mayonnaise


The pasta I chose was Pipette because it doesn't fall apart when you cook it like shells do.  I also cooked it al dente.


Defrost the shrimp, making sure to dry it as much as possible.  When your pasta is done, pour into a colander and run cold water over it to stop the cooking process.  Add your shrimp.


Cut the tips off of your snap peas and cut into bite-size pieces.


As for the tomatoes, I cut them in half lengthwise, and laid them out on paper towels.  I wanted to get as much of the juice and seeds out  as I could, so they wouldn't make the salad watery.  I also add these last, just before I serve the salad so they won't get mushy.


When it comes to cutting the scallions, I find the easiest way to do it is with scissors.  That way the scallions don't get crushed as they do when you use a knife.  
Combine everything (except for your tomatoes) into one bowl and prepare your dressing.


I add half the dressing now, and refrigerate the salad for a while.  This lets the pasta absorb some of the dressing.  Just before I serve the salad, I add the other half, along with the tomatoes and a generous amount of shredded Parmesan cheese.  Salt and pepper to taste and you are good to go.


There you have it.  Please make sure to taste this!  I ended up adding more scallions because I wanted a little more "oniony" flavor.  Feel free to add anything else you would like, such as olives or artichoke hearts, or celery...... the ideas are endless!